This Iced Coffee Cookies Recipe is really easy to make and have a great coffee taste. The icing is optional - I used to make these for a local tearoom, so they look pretty fancy, but you can make a simple icing or leave the icing out altogether.
Why make this recipe?
- Coffee version of the traditional iced cookies
- Firm biscuit base, which is perfect for decorating
- Great to give as a presents or token gifts for parties, weddings or other celebrations

My top tips on making this recipe successfully the first time round
- Measure out the ingredients properly using digital scales
- Use greaseproof paper to roll out your dough
- Chill the dough after you've rolled it out flat
- Leave the biscuits to dry out completely before packaging
Time saving tip
If you want to give them away or share them, it's best to make them the day before (or at least 24 hrs in advance) because the icing does need time to dry and harden.
If you don't have the time, you can just use one colour icing and pour or spread it on. Even light drizzling is going to look amazing.
What makes this recipe work
- The ratio of butter to flour is what gives this biscuit recipe that great flavour
- This recipe doesn't have any raising agent (baking soda or baking powder) which makes them really nice and flat - perfect for your decorating
Any specialist equipment needed?
- Greaseproof paper
- Biscuits cutter of your choice (or go freehand with a small kitchen knife)
- Rolling Pin
- Pipping bag
- Pipping tips & sugar craft tools (optional)
- Edible colours (optional)
- Edible glitter or sugarcraft decorations
Pro tip
- If you don't have a pipping bag, use a small spoon to spread the icing on to your biscuits or use a sturdy plastic bag (with cut of corner)
Ingredients
- Butter - unsalted
- Sugar - caster
- Egg - medium
- Vanilla extract
- Flour - plain (all purpose)
- Granulated coffee powder
- Icing sugar for the icing
How to make iced coffee butter cookies
Preparing the dough
First of all - either in a mixer or with a handheld whisk, beat the butter and sugar together until creamy and fluffy. Add the eggs and coffee flavouring and mix until they are well combined.
Add flour to the bowl and mix until all the ingredients just come together. The dough is going go be fairly firm at this stage, but that's fine. The dough needs to rest before you roll it out and bake it, so tip it out and wrap in a clingfilm and refrigerate for at least 30 minutes.
Rolling out the dough
The next step is to roll out the dough into about 8 mm. Take two large greaseproof papers and roll out half (or third) of the dough between them.
You can try to roll the dough out without the greaseproof papers, but I found that this is much easier (the dough can be quite sticky) and I always use the papers to line the baking trays, so that there is no waste. It will also prevent you from adding extra flour for dusting (which can make the biscuits quite dry).
Chilling the dough
If you have the time, you can put the rolled out dough back to fridge before you cut out your biscuit shapes. This makes the dough much easier to handle and your biscuits are not going to expand too much when you get to bake them.
When you are ready, use biscuits cutters to cut out your shapes and place (with plenty of space between) on a baking tray.

EXTRA TIP
To make sure that your coffee cookies have enough coffee flavour, taste the dough before you leave it to chill in the fridge.
If you think you need extra coffee flavour just mix more coffee granules with a tiny bit of hot water and add it to the dough. Taste again, until you are happy with the flavour.
Baking
Bake the biscuits in a preheated oven at 180C, 350 F (gas mark 4) for about 7-10 minutes. The timing depends on the size and thickness of your biscuits, but the final colour should be slightly darker brown.
The fact that these cookies are flavoured with coffee makes it a bit tricky to decide when to take them out. I find that the best way to know is to set an oven timer on and then visually check. They should be the same colour all round. If the sides are getting too brown or dark, it's probably too much.
Leave them to cool on a cooling rack and store in an airtight container until you are ready to decorate them.
Decorating
To mix the icing, just use water and icing (fine confectionery) sugar mixed to a thinner paste. Vanilla extract makes a great flavour addition to the icing and I think it works really well with the coffee flavour. If you are using 'flood' icing technique, you need to have even runnier icing.
Depending on how much icing you need, mix a smaller amount of water with icing sugar and continue to add more icing sugar as you stir.
Once you've mixed your icing, colour them to your desired shade. To get really vibrant colours, you really need to use sugarcraft colours like Wilton or Sugarflair. They come in small pots and are so concentrated that you only need a tiny amount to colour a whole batch of icing.
Use a piping bag with a number 1.5 or 2 nozzle (or large if you want) or if you don't have piping nozzle, just cut your piping bag with a very small hole.
I first pipe all my outlines and when dry I fill them with the flood icing. Once you've finished your icing, leave the biscuits to dry. This can take anything up to 24 hrs (they look dry after 2 hours, but that's just the top crust forming and the layer underneath is still soft). Our kitchen is nice and cold, which means that the biscuits soften over night and dry at the same time.
After that, they biscuits are ready to be packed, eaten or given away as a little treats and presents.
A quick option for decorating
If you don't have the time or the inclination to decorate your biscuits, you can easily leave them as they are. Alternatively mix the icing together and just drizzle your biscuits and decorate them with a few edible golden flakes or sugarcraft decorations.
Recipe variations
You can replace the coffee granules with cocoa powder, carob powder, lemon zest or just use vanilla or other flavourings to create plain biscuits.
Coffee and chocolate also work together and you can create a mocha coffee iced cookies.
Allergies & dietary requirements
I've not tested this recipe with gluten free flour or egg replacements to suit other diets.
Batch size
This recipe will make 15 very large and chunky biscuits and about 25 regular size ones.
Can I scale up or down this recipe?
You can easily make 1/2 batch or double/triple the recipe. The only thing you'll be limited is your kitchen/fridge space and baking trays number.
How to store cookies
Make sure that your coffee biscuits are completely dry before you wrap them or store them away.
If you are just keeping them for yourself, place the biscuits between sheets of greaseproof paper and in a large airtight tin or container. They won't stick, but they could scoff, so the greaseproof paper protects your lovely icing and decorations.
If you are giving them as gifts, just wrap them individually in a cellophane bags.
Shelf-life
These coffee cookies have a good shelf life - they will be fine for 3-4 days, but if you prevent them from drying out, they will be perfectly fine for at least 7 days.
This recipe and me
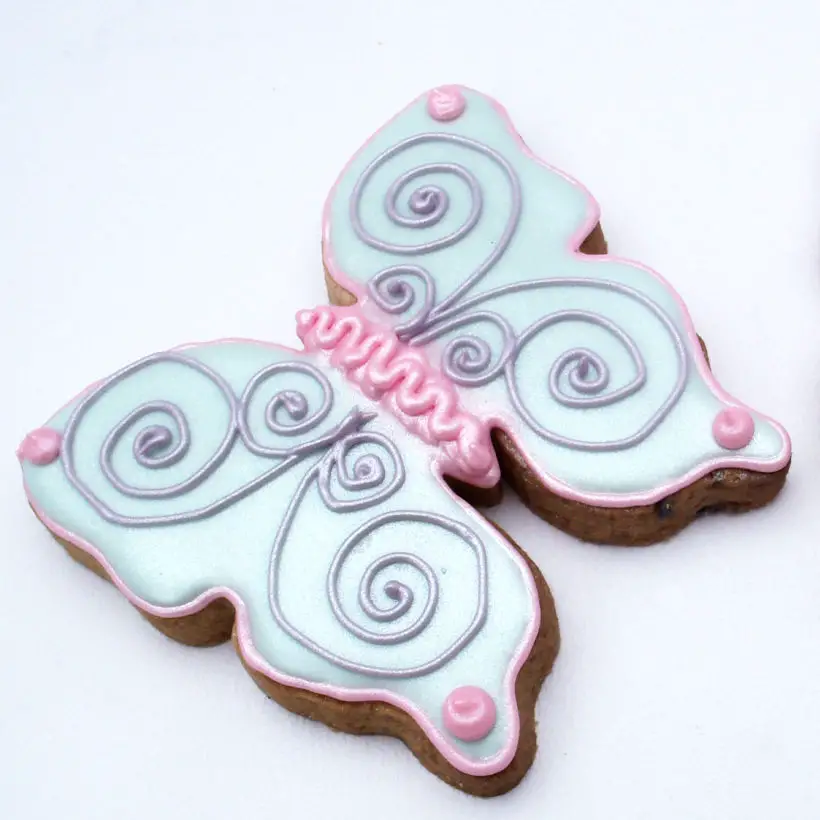
I used to make these Coffee Iced Cookies recipe for the Down House tearooms for special occasions. Down House is the place where Charles Darwin lived with his family, which is why I've chosen the butterflies as a shape for my biscuits.
MORE BISCUITS RECIPES


Iced coffee butter cookies
Ingredients
- 500 grams plain flour
- 250 grams unsalted butter
- 250 grams caster sugar
- 1 egg large or 2 small-medium
- 1 tablespoon coffee granules dissolved in tablespoon of hot water
- pinch of salt
Vanilla Icing
- 1/2 teaspoon vanilla extract
- 100 grams icing sugar fine, confectioners sugar
- 1 tablespoon water or slightly more to achive a runny consistency
Instructions
- Using mixer or a handheld whisk, beat the butter and sugar together until creamy and fluffy.
- Mix coffee granules with small amount of hot water to create a watery paste.
- Add the eggs and coffee flavouring and mix until they are well combined.
- Add flour, pinch of salt to the bowl and mix until all the ingredients just come together.
- Taste the dough to check that you are happy with the amount of coffee flavour. If you think it's not enough mix another 1 teaspoon or so with a tiny bit of water and mix it in. Taste again before you leave the dough to rest.
- The dough needs to rest before you roll it out and bake it. Wrap the dough in clingfilm and refrigerate for at least 30 minutes.
- Roll out the dough into about 8 mm. To make this step easier, take two large greaseproof papers and roll out half (or third) of the dough between them.
- If you have the time, you can put the rolled out dough back to fridge before you cut out your biscuit shapes. This makes the dough much easier to handle and your biscuits are not going to expand too much when you get to bake them.
- When you are ready, use biscuits cutters to cut out your shapes and place (with plenty of space between) on a baking tray.
- Bake the biscuits in a preheated oven at 180C, 350 C (gas mark 4) for about 7-10 minutes. The timing depends on the size and thickness of your biscuits, but the final colour should be darker brown.
- Leave them to cool on a cooling rack and store in airtight container until you are ready to decorate them.
- To decorate your biscuits blend icing sugar with a bit of water and vanilla extract to a slightly thicker consistency. Add colouring if you like or leave plain to drizzle over the biscuits.
- Use a piping bag with a number 1.5 or 2 nozzle (or large if you want) or if you don't have piping nozzle, just cut your piping bag with a very small hole.
- I first pipe all my outlines and when dry I fill them with slightly runnier icing. Once you've finished your icing, leave the biscuits to dry. This can take anything up to 24 hrs (they look dry after 2 hours, but that's just the top crust forming and the layer underneath is still soft).
- After that, they biscuits are ready to be packed, eaten or given away as a little treats and presents.


Leave a Reply