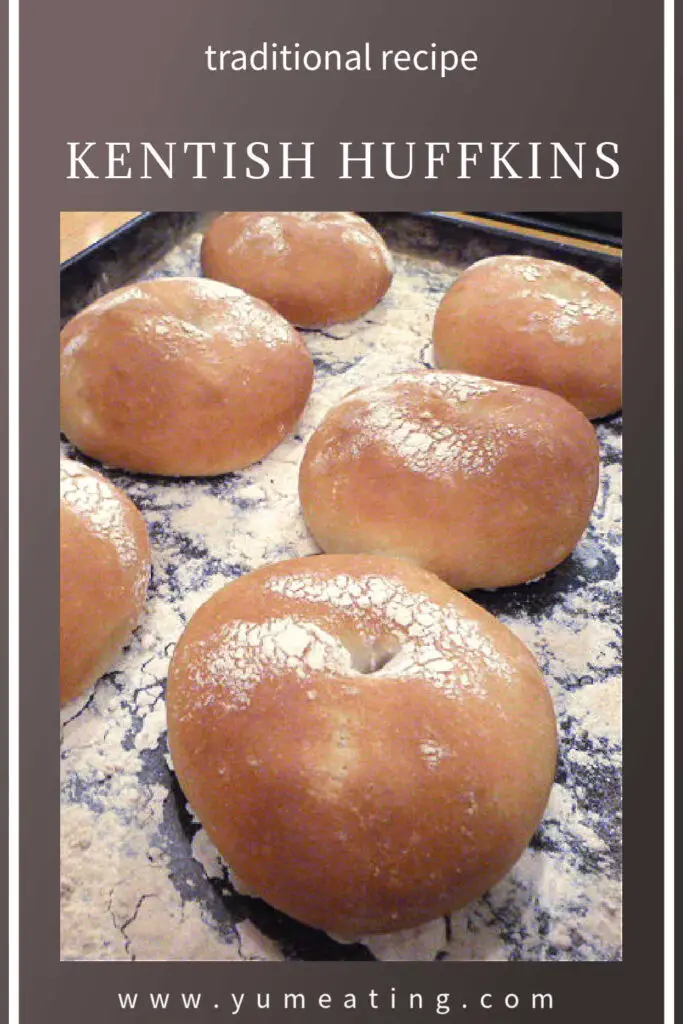
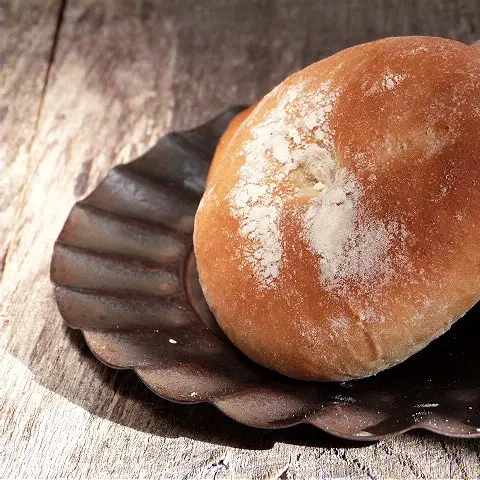
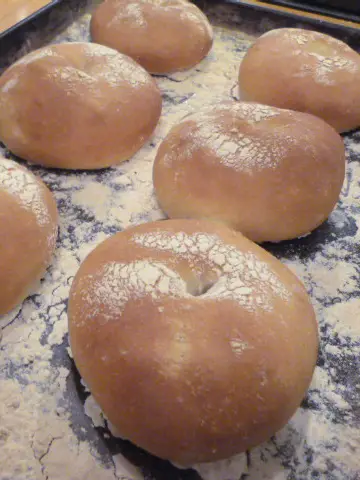
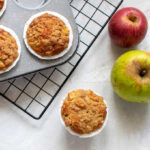
The Kentish Huffkin is a traditional bread roll with a dimple in the middle popular in Kent, UK. Originally baked for the cherry pickers, who would eat their huffkin with jam and a dollop of cream.
I’m always fascinated by historical recipes and their stories and this one is no different. The first huffkin was baked by a farmers wife from Faversham who baked it for their cherry pickers.
The idea is that the thumb indentation in the middle of the roll is to hold a cherry from a cherry jam (so that it doesn’t roll out as you eat it).
I’ve started to make this recipe about 13 years ago, when I was researching local recipes for my bread baking class. The Kentish Huffkin rolls were a great hit with my students, so I thought I’d share it with you here too.
PIN THIS RECIPE FOR LATER
MY OTHER FAVOURITE BREAD RECIPES
- Easy Dinner Biscuits – Rolls >>
- No-knead Rye Bread >>
- Traditional Russian Black Bread >>
- Wholemeal Soda Bread >>
What is Kentish Huffkin?
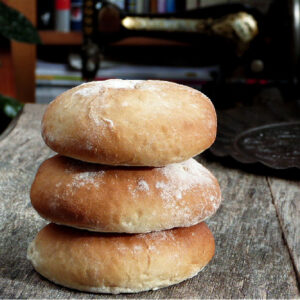
Kentish Huffkin is essentially a large white soft roll with a dimple in the middle, so it kind of looks like badly made bagel. Since it’s usually made with white flour, it tastes like a very lovely roll and soft enough inside.
You can use Kentish Huffkin anywhere where you would soft roll and serve it with any kind of food that you would use rolls with. It’s very versatile!
Kentish Huffkins history background
From what I can understand, the roll, although not very sweet itself was ment to be eaten with fruit jam and cream. These days, I’ve seen in local Kent pubs served instead of bread with Ploughman’s lunch and eaten with cheese, meats and other savoury fillings.
The Kentish Huffkin history goes back to the 16th century, when the King Henry VIII become fond of cherries when visiting France and wanted to have the same cherries in England.
The land around Faversham in Kent was suitable for growing cherries (which need quite a lot of sun), so the King decided to give the land to a local knight called Richard Harry, so that he can grow cherries for him.
Over the years the cherry growing become very important for Kent and each year the farmers needed a large amount of people to come and pick the cherries.
There was not enough labour locally, so many people arrived from London to work on the farms for few weeks in the summer.
These cherry pickers were usually women and older children from poor areas of London. As much as work, this was a welcome break for them from the smoke and dust of London and the families would come year after year for their ‘annual holiday’!

Notes on Kentish Huffkins Ingredients
Flour
The main difference from other types of bread rolls is the use of plain flour instead of bread flour in this recipe.
You can also use a blend of plain or low gluten or naturally gluten free white flours such as lupin flour or potato flour. I would add a maximum of 10-20% of gluten free flour to the regular white plain flour mix to make sure that your dough structure still works.
Plain flour has less gluten in (or less strong gluten) than bread flour, which means that the bread roll is deliciously soft and light.
Because the roll is fairly flat, the gluten is not that necessary to provide structure, so this is an ideal recipe to use if you have any leftover plain flour (or you run out of bread flour).
Milk & Water Mixture
To make up the dough, you’ll need a mixture of milk and water. To make the dough a bit richer you can use just milk, but if you are either running out of milk or want to save a bit, use 50% water and 50% milk.
Any milk will do. My guess is that because this recipe was originally made by a farmer’s wife they had plenty of leftover milk, which she mixed with water to make the milk go a bit further.
She might also add the milk in because the rolls were for children as well as adults (women mainly) and milk was added to bread because of the calcium (to make the rolls or bread more nourishing for the children).
You can use plant based milk with this recipe, if you want to make these rolls for your vegan friends, but bear in mind that some milks (like coconut or even soya) are quite strong flavour wise. I’d probably go with something like oats milk.
Butter
Butter makes these rolls extra soft and it also adds a very creamy texture and delicious flavour. Traditionally, you would use lard with this recipe, because it was cheaper. These days, you’ll probably have a butter in your fridge rather than a lard, so just use that.
If you don’t have butter or want to keep this recipe vegan friendly, leave it out all together. The recipe will still work, it will just change flavour slightly.
Sugar
This recipe is originally quite sweet because it ment to be eaten with jam. If you prefer to eat your Huffkins with cheese or meats, add less sugar (or leave it out all together).
BREAD RECIPES
Few tips on making my Kentish Huffkins recipe successfully
The Kentish Huffkin recipe itself is fairly simple, it’s not much different to a white bread recipe in terms of dough structure, shaping and baking.
Dough shaping
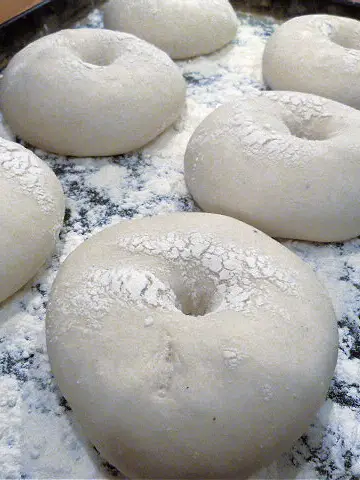
Divide the dough into 8 pieces (weigh them if you are not sure). Shape them like a rolls to start off, then flatten them slightly and leave them to rise for the second time.
Just before they are ready to go to the oven, make a deep thumbprint in each roll.
I’ve previously made about 6 very large huffkins (probably too big!), so now I divide the dough into about 8 pieces. The final size ment to be around the size of a bagel.
Baking
The baking time will depend on the size of your huffkins. Smaller ones will be baked within 15 minutes, but if you prefer large ones they might need extra 5 minutes.
Your oven should be a a constant 220C or even lower if you want your rolls to be golden rather than brown in colour.
Keeping your rolls soft
To make your huffkins nice and soft, cover them with a clean teatowel (or even plastic) when then come of from the oven.
Put them on a cooling rack and cover with tea towel. This helps the steam to escape at the bottom (which keeps baking the huffkins), whilst the steam that’s escaping from the top bounces back to the dough and keeps it nice and moist.
How to make Kentish Huffkins step by step
Put the flour, yeast, salt and sugar into a bowl and rub in the lard or butter.
Make a well in the centre, then pour in the warm milk.
Mix everything well together to form a dough that leaves the sides of the bowl clean.
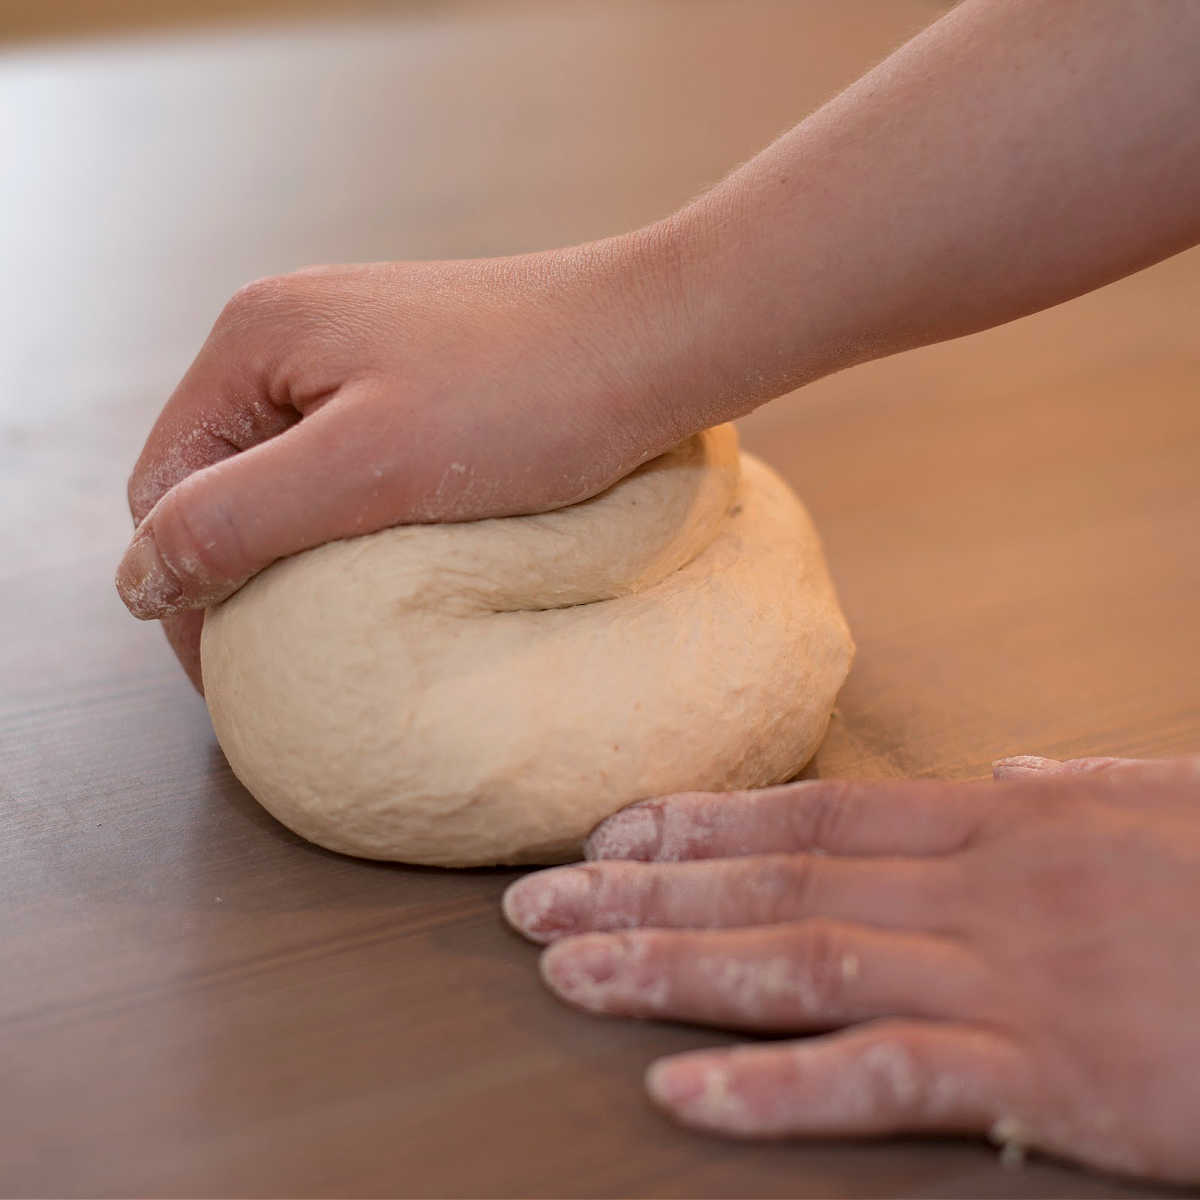
Turn out onto an oiled kitchen surface and kneed well for about 10 minutes until the dough becomes smooth and elastic.
Place in a clean bowl and cover with a clean tea towel.
Leave to rise for about an hour, or until the dough has doubled in size.
Divide the dough into 6-8 pieces, depending on how big you want them to be.
Roll each dough piece into a firm roll first and then slightly flatten.
Place on greased baking sheets, giving each huffkin plenty of space.
Lightly dust with more flour.
Cover and leave for about half an hour until double in size.
Heat the oven to 220C/435F/Gas 7
Just before putting the huffkins in the oven, make a deep thumbprint in each roll.
Bake for 15-20 minutes, until the crust is a deep golden brown.
Recipe size
This recipe will give you 8 large Kentish Huffkins.
You can easily scale up (or down) the recipe and make as many rolls as you want to. I can easily triple the recipe and knead (by hand) dough that’s made from 1,5 kg. It’s quite a lot if you are a beginner, so I’d suggest to only double the recipe to start off with.
Alternatively, you can also knead this dough in the mixer, but you’d need to check the capacity of your dough mixer (as if you use too much dough you might damage the mixer engine).
When doubling the recipe ingredients, use the recipe quantities and click on 2x and the recipe card will multiply the ingredients for you.
The kneading, proving and baking time will remain the same, whether you double or triple the ingredients.
You will also need more baking trays and make sure that you have enough space in your oven (or stagger the baking time, if you can’t fit all baking trays in at the same time).
If you need to slow down the rising of your dough (first or second) and you need to stagger the baking, because you don’t have enough space, it might be worth halving the dough and leaving to prove some of the dough or the rolls (for the second proving) in the fridge to slow down the proving process. This way, it gives you enough time to bake the first batch and you won’t end up with over-prooven rolls.
How to serve huffkins
Whilst originally Kentish Huffkins were served with sweet toppings, they can be used as any soft rolls and can be served both with sweet or savoury spreads and toppings.
Kentish Huffkins rolls are delicious with butter and jam (try cherry jam to keep with the tradition) or savoury homemade butter with herbs , cheese or pate.
Fruit curds, such as Lime Curd or Mango Curd are great too as well as marmalades (like my Tangerine Marmalade or Sweet Orange & Lime Marmalade. My quince jam is also perfect with this recipe.
How long do Kentish Huffkins last?
Since Kentish Huffkins are essentially soft white rolls, they usually last up to 3 days and they keep nice and soft.
They will last easily up to 7 days, but you will start noticing that from day 2-3 they will start getting slightly tougher. This is easily solved, by warming up the rolls in microwave or oven or cutting the in half and toasting them.
How to store your Kentish Huffkins
The best way to store Kentish Huffkins is like any other soft rolls or bagels. I find that the best way to keep them fresh is to store them in paper bag inside a tin bread bin.
This way, the rolls keep for a good 4-5 days.
Can you freeze Kentish Huffkins rolls?
Yes, Kentish Huffkins rolls can be frozen for up to 3-6 months.
I find that the best way to freeze soft rolls, is to freeze them first individually by spacing them out on a baking tray and putting them inside the freezer for about 4 hours (not covered).
When the rolls are frozen, I transfer them to a freezer bag (or suitable freezer container with lid), making sure there’s no air inside the bag and sealing them with freezer bag tie and label with today’s date.
This way, the rolls won’t stick to each other and I can take out one huffkin roll at the time and don’t have to de-frost the whole batch.
Kentish Huffkins – Traditional Bread Rolls
Ingredients
- 450 grams plain flour
- 2 teaspoons sugar (less for savoury option)
- 1 teaspoon salt
- 7 grams instant yeast one sachet
- 220 ml warm fresh milk mixed with water
- 50 grams lard or butter
Instructions
- Put the flour, yeast, salt and sugar into a bowl and rub in the lard or butter.
- Make a well in the centre, then pour in the warm milk.
- Mix everything well together to form a dough that leaves the sides of the bowl clean.
- Turn out onto an oiled kitchen surface and kneed well for about 10 minutes until the dough becomes smooth and elastic.
- Place in a clean bowl and cover with a clean tea towel.
- Leave to rise for about an hour, or until the dough has doubled in size.
- Divide the dough into 6-8 pieces, depending on how big you want them to be.
- Roll each dough piece into a firm roll first and then slightly flatten.
- Place on greased baking sheets, giving each huffkin plenty of space.
- Lightly dust with more flour.
- Cover and leave for about half an hour until double in size.
- Heat the oven to 220C/435F/Gas 7
- Just before putting the huffkins in the oven, make a deep thumbprint in each roll.
- Bake for 15-20 minutes, until the crust is a deep golden brown.
- Wrap in a warm clean tea towel (this helps keep the crust soft) and leave to cool.
Nutrition
This blog post was originally written on 17 November 2020 and last updated on 31 March 2023


Oh, why have I never heard of huffkins? What a fabulous name. They sound very similar to our Cornish splits, which are also meant to be eaten with jam and cream. Great to hear the story of how they came about. Good to hear that King Henry has some positive points.
Love how there are so many different types of bread from all around the country and they all have their own histories!
I’ve never heard of these at all but they look awesome. I’m a huge fan of a soft bread made with milk and a bit of butter so they’re going to be a must try for me!
I love a recipe with a history behind it and always try to add a recipes origins on my website too. These look delicious, I can probably make these easily to suit my dietary needs but wonder if I might be able to make these gluten free too, hmmmm? I’m game for trying!